Showing posts with label computer tricks. Show all posts
Showing posts with label computer tricks. Show all posts
Friday, January 2, 2009

How to Rename the Recycle Bin
To change the name of the Recycle Bin desktop icon, open Regedit and go to:
HKEY_CLASSES_ROOT/CLSID/{645FF040-5081-101B-9F08-00AA002F954E}
HKEY_CLASSES_ROOT/CLSID/{645FF040-5081-101B-9F08-00AA002F954E}
and change the name "Recycle Bin" to whatever you want (don't type any quotes).
Speed up your browsing of Windows 2000 & XP machines
Here's a great tip to speed up your browsing of Windows XP machines. Its actually a fix to a bug installed as default in Windows 2000 that scans shared files for Scheduled Tasks. And it turns out that you can experience a delay as long as 30 seconds when you try to view shared files across a network because Windows 2000 is using the extra time to search the remote computer for any Scheduled Tasks. Note that though the fix is originally intended for only those affected, Windows 2000 users will experience that the actual browsing speed of both the Internet & Windows Explorers improve significantly after applying it since it doesn't search for Scheduled Tasks anymore. Here's how :
src="http://pagead2.googlesyndication.com/pagead/show_ads.js">
Open up the Registry and go to :
HKEY_LOCAL_MACHINE/Software/Microsoft/Windows/Current Version/Explorer/RemoteComputer/NameSpace
Under that branch, select the key :
{D6277990-4C6A-11CF-8D87-00AA0060F5BF}
and delete it.
This is key that instructs Windows to search for Scheduled Tasks. If you like you may want to export the exact branch so that you can restore the key if necessary.
This fix is so effective that it doesn't require a reboot and you can almost immediately determine yourself how much it speeds up your browsing processes.
Thursday, July 31, 2008
Broadband Speed From Dial up/GPRS Modem.

Broadband Speed From Dial up/GPRS Modem.
Features :
Code:
http://rapidshare.com/files/73387509/TweakMaster_PRO_FULL.rar
Wednesday, July 30, 2008
How to control your home computer from anywhere (free)
Here is a tutorial on how to hide files in Jpg's
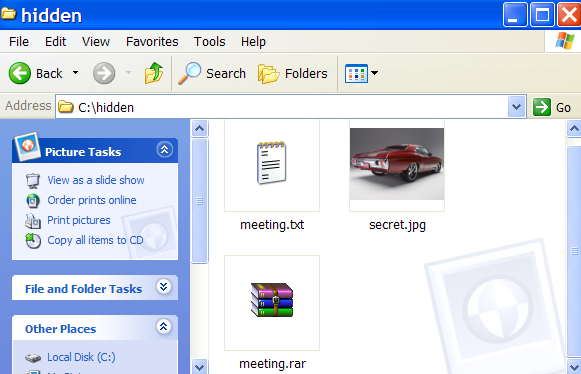
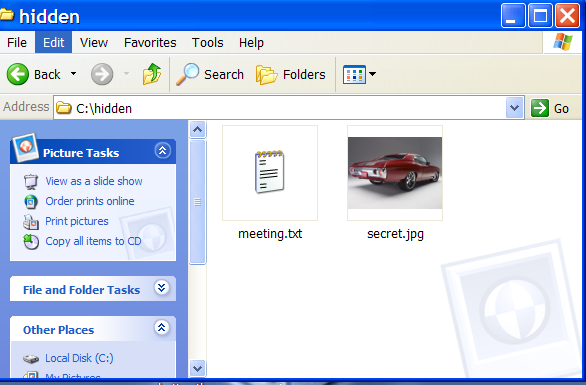 2. Add the files you want to hide into a new RAR archive eg. meeting.rar
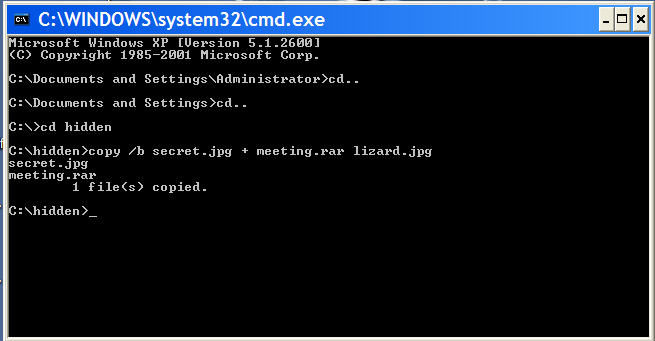
 3. Open Command Prompt by typing cmd in RUN and type the following command (this is just example . comand depends on where you create the file)
>cd..
>cd..
>cd hidden
>copy /b secret.jpg + meeting.rar lizard.jpg where secret.jpg is the original picture, meeting.rar is the file to be hidden, and lizard.jpg is the file which contains both.
as shown below
3. Open Command Prompt by typing cmd in RUN and type the following command (this is just example . comand depends on where you create the file)
>cd..
>cd..
>cd hidden
>copy /b secret.jpg + meeting.rar lizard.jpg where secret.jpg is the original picture, meeting.rar is the file to be hidden, and lizard.jpg is the file which contains both.
as shown below
 4 . so the new picture lizard.jpg which contained the hidden file is created
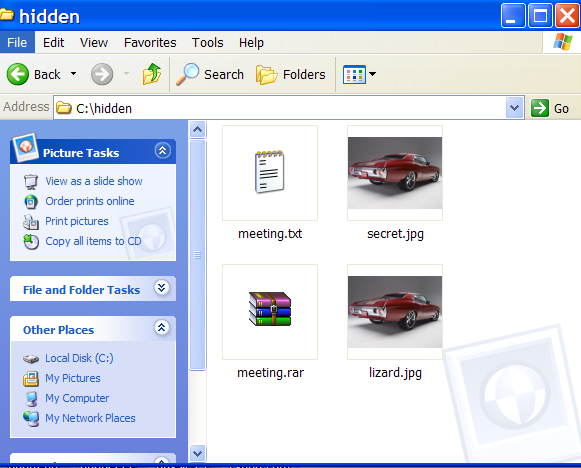 [color=orange][b]When you view the picture you will see only the picture (not the hidden file). To see the the hidden file inside the picture change the file extension from .jpg to .rar and extract it.
You can use this method to hide some files from average user.
[color=orange][b]When you view the picture you will see only the picture (not the hidden file). To see the the hidden file inside the picture change the file extension from .jpg to .rar and extract it.
You can use this method to hide some files from average user.Restart windows without restarting your PC
this works both with windows vista and xp.
so heres the trick..
Vista:
Select Start, then hover over the right arrow that is to the right of
the padlock icon until the pop-up menu appears that contains “restart”
as one of it’s choices. Hold down the SHIFT key while clicking on the
“restart” choice.
Windows xp
Select Start. Select “Shut Down…”. Change the drop-down combo box under “What do you want the computer to do?” to “Restart”. Hold down the SHIFT key while clicking on the “OK” button.
Tuesday, July 1, 2008
A-Z keyboard shortcuts
*
Shift + F10 right-clicks.
*
Win + L (XP Only): Locks keyboard. Similar to Lock Workstation.
*
Win + F or F3: Open Find dialog. (All Files) F3 may not work in some applications which use F3 for their own find dialogs.
*
Win + Control + F: Open Find dialog. (Computers)
*
Win + U: Open Utility Manager.
*
Win + F1: Open Windows help.
*
Win + Pause: Open System Properties dialog.
*
Win + Tab: Cycle through taskbar buttons. Enter clicks, AppsKey or Shift + F10 right-clicks.
*
Win + Shift + Tab: Cycle through taskbar buttons in reverse.
*
Alt + Tab: Display Cool Switch. More commonly known as the AltTab dialog.
*
Alt + Shift + Tab: Display Cool Switch; go in reverse.
*
Alt + Escape: Send active window to the bottom of the z-order.
*
Alt + Shift + Escape: Activate the window at the bottom of the z-order.
*
Alt + F4: Close active window; or, if all windows are closed, open shutdown dialog.
*
Shift while a CD is loading: Bypass AutoPlay.
*
Shift while login: Bypass startup folder. Only those applications will be ignored which are in the startup folder, not those started from the registry (Microsoft\Windows\CurrentVersion\Run\)
*
Ctrl + Alt + Delete or Ctrl + Alt + NumpadDel (Both NumLock states): Invoke the Task Manager or NT Security dialog.
*
Ctrl + Shift + Escape (2000/XP ) or (Ctrl + Alt + NumpadDot) : Invoke the task manager. On earlier OSes, acts like Ctrl + Escape.
*
Print screen: Copy screenshot of current screen to clipboard.
*
Alt + Print screen: Copy screenshot of current active window to clipboard.
*
Ctrl + Alt + Down Arrow: Invert screen. Untested on OS's other than XP.
*
Ctrl + Alt + Up Arrow: Undo inversion.
*
Win + B : Move focus to systray icons.
General
*
Ctrl + C or Ctrl + Insert: Copy.
*
Ctrl + X or Shift + Delete: Cut.
*
Ctrl + V or Shift + Insert: Paste/Move.
*
Ctrl + N: New... File, Tab, Entry, etc.
*
Ctrl + S: Save.
*
Ctrl + O: Open...
*
Ctrl + P: Print.
*
Ctrl + Z: Undo.
*
Ctrl + A: Select all.
*
Ctrl + F: Find...
*
Ctrl+W : to close the current window
*
Ctrl + F4: Close tab or child window.
*
F1: Open help.
*
F11: Toggle full screen mode.
*
Alt or F10: Activate menu bar.
*
Alt + Space: Display system menu. Same as clicking the icon on the titlebar.
*
Escape: Remove focus from current control/menu, or close dialog box.
General Navigation
*
Tab: Forward one item.
*
Shift + Tab: Backward one item.
*
Ctrl + Tab: Cycle through tabs/child windows.
*
Ctrl + Shift + Tab: Cycle backwards through tabs/child windows.
*
Enter: If a button's selected, click it, otherwise, click default button.
*
Space: Toggle items such as radio buttons or checkboxes.
*
Alt + (Letter): Activate item corresponding to (Letter). (Letter) is the underlined letter on the item's name.
*
Ctrl + Left: Move cursor to the beginning of previous word.
*
Ctrl + Right: Move cursor to the beginning of next word.
*
Ctrl + Up: Move cursor to beginning of previous paragraph. This and all subsequent Up/Down hotkeys in this section have only been known to work in Rich Edit controls.
*
Ctrl + Down: Move cursor to beginning of next paragraph.
*
Shift + Left: Highlight one character to the left.
*
Shift + Right: Highlight one character to the right.
*
Shift + Up: Highlight from current cursor position, to one line up.
*
Shift + Down: Highlight from current cursor position, to one line down.
*
Ctrl + Shift + Left: Highlight to beginning of previous word.
*
Ctrl + Shift + Right: Highlight to beginning of next word.
*
Ctrl + Shift + Up: Highlight to beginning of previous paragraph.
*
Ctrl + Shift + Down: Highlight to beginning of next paragraph.
*
Home: Move cursor to top of a scrollable control.
*
End: Move cursor to bottom of a scrollable control.
File Browser
*
Arrow Keys: Navigate.
*
Shift + Arrow Keys: Select multiple items.
*
Ctrl + Arrow Keys: Change focus without changing selection. "Focus" is the object that will run on Enter. Space toggles selection of the focused item.
*
(Letter): Select first found item that begins with (Letter).
*
BackSpace: Go up one level to the parent directory.
*
Alt + Left: Go back one folder.
*
Alt + Right: Go forward one folder.
*
Enter: Activate (Double-click) selected item(s).
*
Alt + Enter: View properties for selected item.
*
F2: Rename selected item(s).
*
Ctrl + NumpadPlus: In a Details view, resizes all columns to fit the longest item in each one.
*
Delete: Delete selected item(s).
*
Shift + Delete: Delete selected item(s); bypass Recycle Bin.
*
Ctrl while dragging item(s): Copy.
*
Ctrl + Shift while dragging item(s): Create shortcut(s).
*
In tree pane, if any:
*
Left: Collapse the current selection if expanded, or select the parent folder.
*
Right: Expand the current selection if collapsed, or select the first subfolder.
*
Numpad Asterisk: Expand currently selected directory and all subdirectories. No undo.
*
Numpad Plus: Expand currently selected directory.
*
Numpad Minus: Collapse currently selected directory.
Accessibility
*
Right Shift for eight seconds: Toggle FilterKeys on and off. FilterKeys must be enabled.
*
Left Alt + Left Shift + PrintScreen: Toggle High Contrast on and off. High Contrast must be enabled.
*
Left Alt + Left Shift + NumLock: Toggle MouseKeys on and off. MouseKeys must be enabled.
*
NumLock for five seconds: Toggle ToggleKeys on and off. ToggleKeys must be enabled.
*
Shift five times: Toggle StickyKeys on and off. StickyKeys must be enabled.
*
6.) Microsoft Natural Keyboard with IntelliType Software Installed
*
Win + L: Log off Windows.
*
Win + P: Open Print Manager.
*
Win + C: Open control panel.
*
Win + V: Open clipboard.
*
Win + K: Open keyboard properties.
*
Win + I: Open mouse properties.
*
Win + A: Open Accessibility properties.
*
Win + Space: Displays the list of Microsoft IntelliType shortcut keys.
*
Win + S: Toggle CapsLock on and off.
Remote Desktop Connection Navigation
*
Ctrl + Alt + End: Open the NT Security dialog.
*
Alt + PageUp: Switch between programs.
*
Alt + PageDown: Switch between programs in reverse.
*
Alt + Insert: Cycle through the programs in most recently used order.
*
Alt + Home: Display start menu.
*
Ctrl + Alt + Break: Switch the client computer between a window and a full screen.
*
Alt + Delete: Display the Windows menu.
*
Ctrl + Alt + NumpadMinus: Place a snapshot of the entire client window area on the Terminal server clipboard and provide the same functionality as pressing Alt + PrintScreen on a local computer.
*
Ctrl + Alt + NumpadPlus: Place a snapshot of the active window in the client on the Terminal server clipboard and provide the same functionality as pressing PrintScreen on a local computer.
Mozilla Firefox Shortcuts
*
Ctrl + Tab or Ctrl + PageDown: Cycle through tabs.
*
Ctrl + Shift + Tab or Ctrl + PageUp: Cycle through tabs in reverse.
*
Ctrl + (1-9): Switch to tab corresponding to number.
*
Ctrl + N: New window.
*
Ctrl + T: New tab.
*
Ctrl + L or Alt + D or F6: Switch focus to location bar.
*
Ctrl + Enter: Open location in new tab.
*
Shift + Enter: Open location in new window.
*
Ctrl + K or Ctrl + E: Switch focus to search bar.
*
Ctrl + O: Open a local file.
*
Ctrl + W: Close tab, or window if there's only one tab open.
*
Ctrl + Shift + W: Close window.
*
Ctrl + S: Save page as a local file.
*
Ctrl + P: Print page.
*
Ctrl + F or F3: Open find toolbar.
*
Ctrl + G or F3: Find next...
*
Ctrl + Shift + G or Shift + F3: Find previous...
*
Ctrl + B or Ctrl + I: Open Bookmarks sidebar.
*
Ctrl + H: Open History sidebar.
*
Escape: Stop loading page.
*
Ctrl + R or F5: Reload current page.
*
Ctrl + Shift + R or Ctrl + F5: Reload current page; bypass cache.
*
Ctrl + U: View page source.
*
Ctrl + D: Bookmark current page.
*
Ctrl + NumpadPlus or Ctrl + Equals (+/=): Increase text size.
*
Ctrl + NumpadMinus or Ctrl + Minus: Decrease text size.
*
Ctrl + Numpad0 or Ctrl + 0: Set text size to default.
*
Alt + Left or Backspace: Back.
*
Alt + Right or Shift + Backspace: Forward.
*
Alt + Home: Open home page.
*
Ctrl + M: Open new message in integrated mail client.
*
Ctrl + J: Open Downloads dialog.
*
F6: Switch to next frame. You must have selected something on the page already, e.g. by use of Tab.
*
Shift + F6: Switch to previous frame.
*
Apostrophe ('): Find link as you type.
*
Slash (/): Find text as you type.
Gmail Shortcuts
*
Note: Must have "keyboard shortcuts" on in settings.
*
C: Compose new message.
*
Shift + C: Open new window to compose new message.
*
Slash (/): Switch focus to search box.
*
K: Switch focus to the next most recent email. Enter or "O" opens focused email.
*
J: Switch focus to the next oldest email.
*
N: Switch focus to the next message in the "conversation." Enter or "O" expands/collapses messages.
*
P: Switch focus to the previous message.
*
U: Takes you back to the inbox and checks for new mail.
*
Y: Various actions depending on current view:
*
Has no effect in "Sent" and "All Mail" views.
*
Inbox: Archive email or message.
*
Starred: Unstar email or message.
*
Spam: Unmark as spam and move back to "Inbox."
*
Trash: Move back to "Inbox."
*
Any label: Remove the label.
*
X: "Check" an email. Various actions can be performed against all checked emails.
*
S: "Star" an email. Identical to the more familiar term, "flagging."
*
R: Reply to the email.
*
A: Reply to all recipients of the email.
*
F: Forward an email.
*
Shift + R: Reply to the email in a new window.
*
Shift + A: Reply to all recipients of the email in a new window.
*
Shift + F: Forward an email in a new window.
*
Shift + 1 (!): Mark an email as spam and remove it from the inbox.
*
G then I: Switch to "Inbox" view.
*
G then S: Switch to "Starred" view.
*
G then A: Switch to "All Mail" view.
*
G then C: Switch to "Contacts" view.
*
G then S: Switch to "Drafts" view.
List of F1-F9 Key Commands for the Command Prompt
*
F1 / right arrow: Repeats the letters of the last command line, one by one.
*
F2: Displays a dialog asking user to "enter the char to copy up to" of the last command line
*
F3: Repeats the last command line
*
F4: Displays a dialog asking user to "enter the char to delete up to" of the last command line
*
F5: Goes back one command line
*
F6: Enters the traditional CTRL+Z (^z)
*
F7: Displays a menu with the command line history
*
F8: Cycles back through previous command lines (beginning with most recent)
*
F9: Displays a dialog asking user to enter a command number, where 0 is for first command line entered.
*
Alt+Enter: toggle full Screen mode.
*
up/down: scroll thru/repeat previous entries
*
Esc: delete line
*
Note: The buffer allows a maximum of 50 command lines. After this number is reached, the first line will be replaced in sequence.
Helpful accessibility keyboard shortcuts
*
Switch FilterKeys on and off. Right SHIFT for eight seconds
*
Switch High Contrast on and off. Left ALT +left SHIFT +PRINT SCREEN
*
Switch MouseKeys on and off. Left ALT +left SHIFT +NUM LOCK
*
Switch StickyKeys on and off. SHIFT five times
*
Switch ToggleKeys on and off. NUM LOCK for five seconds
Shift + F10 right-clicks.
*
Win + L (XP Only): Locks keyboard. Similar to Lock Workstation.
*
Win + F or F3: Open Find dialog. (All Files) F3 may not work in some applications which use F3 for their own find dialogs.
*
Win + Control + F: Open Find dialog. (Computers)
*
Win + U: Open Utility Manager.
*
Win + F1: Open Windows help.
*
Win + Pause: Open System Properties dialog.
*
Win + Tab: Cycle through taskbar buttons. Enter clicks, AppsKey or Shift + F10 right-clicks.
*
Win + Shift + Tab: Cycle through taskbar buttons in reverse.
*
Alt + Tab: Display Cool Switch. More commonly known as the AltTab dialog.
*
Alt + Shift + Tab: Display Cool Switch; go in reverse.
*
Alt + Escape: Send active window to the bottom of the z-order.
*
Alt + Shift + Escape: Activate the window at the bottom of the z-order.
*
Alt + F4: Close active window; or, if all windows are closed, open shutdown dialog.
*
Shift while a CD is loading: Bypass AutoPlay.
*
Shift while login: Bypass startup folder. Only those applications will be ignored which are in the startup folder, not those started from the registry (Microsoft\Windows\CurrentVersion\Run\)
*
Ctrl + Alt + Delete or Ctrl + Alt + NumpadDel (Both NumLock states): Invoke the Task Manager or NT Security dialog.
*
Ctrl + Shift + Escape (2000/XP ) or (Ctrl + Alt + NumpadDot) : Invoke the task manager. On earlier OSes, acts like Ctrl + Escape.
*
Print screen: Copy screenshot of current screen to clipboard.
*
Alt + Print screen: Copy screenshot of current active window to clipboard.
*
Ctrl + Alt + Down Arrow: Invert screen. Untested on OS's other than XP.
*
Ctrl + Alt + Up Arrow: Undo inversion.
*
Win + B : Move focus to systray icons.
General
*
Ctrl + C or Ctrl + Insert: Copy.
*
Ctrl + X or Shift + Delete: Cut.
*
Ctrl + V or Shift + Insert: Paste/Move.
*
Ctrl + N: New... File, Tab, Entry, etc.
*
Ctrl + S: Save.
*
Ctrl + O: Open...
*
Ctrl + P: Print.
*
Ctrl + Z: Undo.
*
Ctrl + A: Select all.
*
Ctrl + F: Find...
*
Ctrl+W : to close the current window
*
Ctrl + F4: Close tab or child window.
*
F1: Open help.
*
F11: Toggle full screen mode.
*
Alt or F10: Activate menu bar.
*
Alt + Space: Display system menu. Same as clicking the icon on the titlebar.
*
Escape: Remove focus from current control/menu, or close dialog box.
General Navigation
*
Tab: Forward one item.
*
Shift + Tab: Backward one item.
*
Ctrl + Tab: Cycle through tabs/child windows.
*
Ctrl + Shift + Tab: Cycle backwards through tabs/child windows.
*
Enter: If a button's selected, click it, otherwise, click default button.
*
Space: Toggle items such as radio buttons or checkboxes.
*
Alt + (Letter): Activate item corresponding to (Letter). (Letter) is the underlined letter on the item's name.
*
Ctrl + Left: Move cursor to the beginning of previous word.
*
Ctrl + Right: Move cursor to the beginning of next word.
*
Ctrl + Up: Move cursor to beginning of previous paragraph. This and all subsequent Up/Down hotkeys in this section have only been known to work in Rich Edit controls.
*
Ctrl + Down: Move cursor to beginning of next paragraph.
*
Shift + Left: Highlight one character to the left.
*
Shift + Right: Highlight one character to the right.
*
Shift + Up: Highlight from current cursor position, to one line up.
*
Shift + Down: Highlight from current cursor position, to one line down.
*
Ctrl + Shift + Left: Highlight to beginning of previous word.
*
Ctrl + Shift + Right: Highlight to beginning of next word.
*
Ctrl + Shift + Up: Highlight to beginning of previous paragraph.
*
Ctrl + Shift + Down: Highlight to beginning of next paragraph.
*
Home: Move cursor to top of a scrollable control.
*
End: Move cursor to bottom of a scrollable control.
File Browser
*
Arrow Keys: Navigate.
*
Shift + Arrow Keys: Select multiple items.
*
Ctrl + Arrow Keys: Change focus without changing selection. "Focus" is the object that will run on Enter. Space toggles selection of the focused item.
*
(Letter): Select first found item that begins with (Letter).
*
BackSpace: Go up one level to the parent directory.
*
Alt + Left: Go back one folder.
*
Alt + Right: Go forward one folder.
*
Enter: Activate (Double-click) selected item(s).
*
Alt + Enter: View properties for selected item.
*
F2: Rename selected item(s).
*
Ctrl + NumpadPlus: In a Details view, resizes all columns to fit the longest item in each one.
*
Delete: Delete selected item(s).
*
Shift + Delete: Delete selected item(s); bypass Recycle Bin.
*
Ctrl while dragging item(s): Copy.
*
Ctrl + Shift while dragging item(s): Create shortcut(s).
*
In tree pane, if any:
*
Left: Collapse the current selection if expanded, or select the parent folder.
*
Right: Expand the current selection if collapsed, or select the first subfolder.
*
Numpad Asterisk: Expand currently selected directory and all subdirectories. No undo.
*
Numpad Plus: Expand currently selected directory.
*
Numpad Minus: Collapse currently selected directory.
Accessibility
*
Right Shift for eight seconds: Toggle FilterKeys on and off. FilterKeys must be enabled.
*
Left Alt + Left Shift + PrintScreen: Toggle High Contrast on and off. High Contrast must be enabled.
*
Left Alt + Left Shift + NumLock: Toggle MouseKeys on and off. MouseKeys must be enabled.
*
NumLock for five seconds: Toggle ToggleKeys on and off. ToggleKeys must be enabled.
*
Shift five times: Toggle StickyKeys on and off. StickyKeys must be enabled.
*
6.) Microsoft Natural Keyboard with IntelliType Software Installed
*
Win + L: Log off Windows.
*
Win + P: Open Print Manager.
*
Win + C: Open control panel.
*
Win + V: Open clipboard.
*
Win + K: Open keyboard properties.
*
Win + I: Open mouse properties.
*
Win + A: Open Accessibility properties.
*
Win + Space: Displays the list of Microsoft IntelliType shortcut keys.
*
Win + S: Toggle CapsLock on and off.
Remote Desktop Connection Navigation
*
Ctrl + Alt + End: Open the NT Security dialog.
*
Alt + PageUp: Switch between programs.
*
Alt + PageDown: Switch between programs in reverse.
*
Alt + Insert: Cycle through the programs in most recently used order.
*
Alt + Home: Display start menu.
*
Ctrl + Alt + Break: Switch the client computer between a window and a full screen.
*
Alt + Delete: Display the Windows menu.
*
Ctrl + Alt + NumpadMinus: Place a snapshot of the entire client window area on the Terminal server clipboard and provide the same functionality as pressing Alt + PrintScreen on a local computer.
*
Ctrl + Alt + NumpadPlus: Place a snapshot of the active window in the client on the Terminal server clipboard and provide the same functionality as pressing PrintScreen on a local computer.
Mozilla Firefox Shortcuts
*
Ctrl + Tab or Ctrl + PageDown: Cycle through tabs.
*
Ctrl + Shift + Tab or Ctrl + PageUp: Cycle through tabs in reverse.
*
Ctrl + (1-9): Switch to tab corresponding to number.
*
Ctrl + N: New window.
*
Ctrl + T: New tab.
*
Ctrl + L or Alt + D or F6: Switch focus to location bar.
*
Ctrl + Enter: Open location in new tab.
*
Shift + Enter: Open location in new window.
*
Ctrl + K or Ctrl + E: Switch focus to search bar.
*
Ctrl + O: Open a local file.
*
Ctrl + W: Close tab, or window if there's only one tab open.
*
Ctrl + Shift + W: Close window.
*
Ctrl + S: Save page as a local file.
*
Ctrl + P: Print page.
*
Ctrl + F or F3: Open find toolbar.
*
Ctrl + G or F3: Find next...
*
Ctrl + Shift + G or Shift + F3: Find previous...
*
Ctrl + B or Ctrl + I: Open Bookmarks sidebar.
*
Ctrl + H: Open History sidebar.
*
Escape: Stop loading page.
*
Ctrl + R or F5: Reload current page.
*
Ctrl + Shift + R or Ctrl + F5: Reload current page; bypass cache.
*
Ctrl + U: View page source.
*
Ctrl + D: Bookmark current page.
*
Ctrl + NumpadPlus or Ctrl + Equals (+/=): Increase text size.
*
Ctrl + NumpadMinus or Ctrl + Minus: Decrease text size.
*
Ctrl + Numpad0 or Ctrl + 0: Set text size to default.
*
Alt + Left or Backspace: Back.
*
Alt + Right or Shift + Backspace: Forward.
*
Alt + Home: Open home page.
*
Ctrl + M: Open new message in integrated mail client.
*
Ctrl + J: Open Downloads dialog.
*
F6: Switch to next frame. You must have selected something on the page already, e.g. by use of Tab.
*
Shift + F6: Switch to previous frame.
*
Apostrophe ('): Find link as you type.
*
Slash (/): Find text as you type.
Gmail Shortcuts
*
Note: Must have "keyboard shortcuts" on in settings.
*
C: Compose new message.
*
Shift + C: Open new window to compose new message.
*
Slash (/): Switch focus to search box.
*
K: Switch focus to the next most recent email. Enter or "O" opens focused email.
*
J: Switch focus to the next oldest email.
*
N: Switch focus to the next message in the "conversation." Enter or "O" expands/collapses messages.
*
P: Switch focus to the previous message.
*
U: Takes you back to the inbox and checks for new mail.
*
Y: Various actions depending on current view:
*
Has no effect in "Sent" and "All Mail" views.
*
Inbox: Archive email or message.
*
Starred: Unstar email or message.
*
Spam: Unmark as spam and move back to "Inbox."
*
Trash: Move back to "Inbox."
*
Any label: Remove the label.
*
X: "Check" an email. Various actions can be performed against all checked emails.
*
S: "Star" an email. Identical to the more familiar term, "flagging."
*
R: Reply to the email.
*
A: Reply to all recipients of the email.
*
F: Forward an email.
*
Shift + R: Reply to the email in a new window.
*
Shift + A: Reply to all recipients of the email in a new window.
*
Shift + F: Forward an email in a new window.
*
Shift + 1 (!): Mark an email as spam and remove it from the inbox.
*
G then I: Switch to "Inbox" view.
*
G then S: Switch to "Starred" view.
*
G then A: Switch to "All Mail" view.
*
G then C: Switch to "Contacts" view.
*
G then S: Switch to "Drafts" view.
List of F1-F9 Key Commands for the Command Prompt
*
F1 / right arrow: Repeats the letters of the last command line, one by one.
*
F2: Displays a dialog asking user to "enter the char to copy up to" of the last command line
*
F3: Repeats the last command line
*
F4: Displays a dialog asking user to "enter the char to delete up to" of the last command line
*
F5: Goes back one command line
*
F6: Enters the traditional CTRL+Z (^z)
*
F7: Displays a menu with the command line history
*
F8: Cycles back through previous command lines (beginning with most recent)
*
F9: Displays a dialog asking user to enter a command number, where 0 is for first command line entered.
*
Alt+Enter: toggle full Screen mode.
*
up/down: scroll thru/repeat previous entries
*
Esc: delete line
*
Note: The buffer allows a maximum of 50 command lines. After this number is reached, the first line will be replaced in sequence.
Helpful accessibility keyboard shortcuts
*
Switch FilterKeys on and off. Right SHIFT for eight seconds
*
Switch High Contrast on and off. Left ALT +left SHIFT +PRINT SCREEN
*
Switch MouseKeys on and off. Left ALT +left SHIFT +NUM LOCK
*
Switch StickyKeys on and off. SHIFT five times
*
Switch ToggleKeys on and off. NUM LOCK for five seconds
Single Click Shutdown
Did you know that in Windows XP you can shut down your computer from the (eventually DOS prompt) command line box? Moreover, you can do this by clicking your mouse only once.
All you need to do is... right-click on an empty Desktop spot -> select New -> Shortcut -> type shutdown followed by a space, and then enter one or more of the parameters listed below -> click Next -> type a suggestive name for your new shortcut -> finally, click Finish.
This is the Shutdown.exe (located in %systemroot%\System32, usually C:\Windows\System32) syntax:
shutdown [-i|-l|-s|-r|-a] [-f] [-m \\computername] [-t xx] [-c "Text"] [-d[u][p]:xx:yy]>
Valid command line switches:
-a = Abort system shutdown in progress ONLY IF the -t xx timeout option was already set to ANY value other than 0. ALL switches except -l and -m are ignored during abort.
-c "Text" = Text comment (case insensitive) to be displayed in the Message area of the System Shutdown window. MUST be enclosed between quotes. Maximum allowed 127 ASCII characters.
-d [u][p]:xx:yy = Reason code for shutdown:
u = User code.
p = Planned shutdown code.
xx = Major reason code. Positive integer number less than 256.
yy = Minor reason code. Positive integer number less than 65536.
-f = Force running applications to close without warning.
-i = Display the shutdown interface (GUI). MUST be the first option!
-l = Log off the current user of the local computer (default action). Can NOT be used with the -m option unless the current user has Sysadmin rights, in which case the -m switch takes precedence.
-m \\computername = Remote/network computer name (most always case sensitive) to log off/restart/shut down. Current user MUST have Sysadmin rights to be allowed to use this switch!
-s = Shut down the local computer.
-r = Shut down and restart (reboot) the local computer.
-t xx = Set shutdown timer to timeout for xx seconds. IF NOT specified defaults to 20 seconds. Allowed values between 0 and 99 seconds. The -a switch is the ONLY one that CAN be used during the timeout period.
NOTES:
The dash (-) in front of these switches can be replaced by a forward slash (/).
Spaces are NOT required to separate the shutdown command from ANY following switches, but ARE required to separate ANY switch from its following parameter(s), if any.
For example:
shutdown -s -c "Shutting down!" -t 3
tells your computer to shutdown after waiting for 3 seconds while the System Shutdown window will display text above in the Message area.
Optional: after you're done creating your customized shortcut for shutdown -> right-click on it -> select Properties -> enter your desired key "combo" in the Shortcut Key box (e.g. Ctrl + Alt + End) -> click OK/Apply.
From now on just left-click on your shutdown shortcut or hit that key combination to turn off/restart/log off your computer.
All you need to do is... right-click on an empty Desktop spot -> select New -> Shortcut -> type shutdown followed by a space, and then enter one or more of the parameters listed below -> click Next -> type a suggestive name for your new shortcut -> finally, click Finish.
This is the Shutdown.exe (located in %systemroot%\System32, usually C:\Windows\System32) syntax:
shutdown [-i|-l|-s|-r|-a] [-f] [-m \\computername] [-t xx] [-c "Text"] [-d[u][p]:xx:yy]>
Valid command line switches:
-a = Abort system shutdown in progress ONLY IF the -t xx timeout option was already set to ANY value other than 0. ALL switches except -l and -m are ignored during abort.
-c "Text" = Text comment (case insensitive) to be displayed in the Message area of the System Shutdown window. MUST be enclosed between quotes. Maximum allowed 127 ASCII characters.
-d [u][p]:xx:yy = Reason code for shutdown:
u = User code.
p = Planned shutdown code.
xx = Major reason code. Positive integer number less than 256.
yy = Minor reason code. Positive integer number less than 65536.
-f = Force running applications to close without warning.
-i = Display the shutdown interface (GUI). MUST be the first option!
-l = Log off the current user of the local computer (default action). Can NOT be used with the -m option unless the current user has Sysadmin rights, in which case the -m switch takes precedence.
-m \\computername = Remote/network computer name (most always case sensitive) to log off/restart/shut down. Current user MUST have Sysadmin rights to be allowed to use this switch!
-s = Shut down the local computer.
-r = Shut down and restart (reboot) the local computer.
-t xx = Set shutdown timer to timeout for xx seconds. IF NOT specified defaults to 20 seconds. Allowed values between 0 and 99 seconds. The -a switch is the ONLY one that CAN be used during the timeout period.
NOTES:
The dash (-) in front of these switches can be replaced by a forward slash (/).
Spaces are NOT required to separate the shutdown command from ANY following switches, but ARE required to separate ANY switch from its following parameter(s), if any.
For example:
shutdown -s -c "Shutting down!" -t 3
tells your computer to shutdown after waiting for 3 seconds while the System Shutdown window will display text above in the Message area.
Optional: after you're done creating your customized shortcut for shutdown -> right-click on it -> select Properties -> enter your desired key "combo" in the Shortcut Key box (e.g. Ctrl + Alt + End) -> click OK/Apply.
From now on just left-click on your shutdown shortcut or hit that key combination to turn off/restart/log off your computer.
Subscribe to:
Posts (Atom)

 Posts
Posts

